Simple Way to Prepare Ultimate No-churn no machine peanut butter ice-cream and microwave caramel sauce - Simple Recipe Food
No-churn no machine peanut butter ice-cream and microwave caramel sauce, this is the well liked recipe ever, So easy to prepare and maybe this recipe is the ingredient you will ever need. Everyone needs a good recipe and I can't be the only person forever seeing food on my ripe table. Finally I learned to cook this recipe, and I will share the secret recipe here with easy, flexible, and very delicious!
Hey everyone, it is Jim, welcome to my recipe site. Today, I will show you a way to prepare a distinctive dish, no-churn no machine peanut butter ice-cream and microwave caramel sauce. One of my favorites food recipes. This time, I will make it a bit unique. This is gonna smell and look delicious.
No-churn no machine peanut butter ice-cream and microwave caramel sauce is one of the most favored of recent trending meals in the world. It is easy, it's fast, it tastes delicious. It's enjoyed by millions daily. No-churn no machine peanut butter ice-cream and microwave caramel sauce is something that I have loved my entire life. They're fine and they look wonderful.
To get started with this particular recipe, we have to prepare a few ingredients. You can cook no-churn no machine peanut butter ice-cream and microwave caramel sauce using 9 ingredients and 5 steps. Here is how you cook that.
Recipe Cuisine : British
Prepare Time: 13 mins
Cook Time: 59 mins
Yield: 5 servings
Nutrition Facts: Per serving 142 calories
The ingredients needed to make No-churn no machine peanut butter ice-cream and microwave caramel sauce:
- Take 1 can of condensed milk.
- Take 500 ml of very cold double cream.
- Prepare 270 g of smooth peanut butter.
- Get 2 tsp of vanilla paste.
- Take of chocolate chips to decorate - optional.
- Take of For the caramel sauce - optional.
- Take 60 g of unrefined sugar or golden caster.
- Make ready 20 g of unsalted butter.
- Make ready 100 ml of double cream.
Steps to make No-churn no machine peanut butter ice-cream and microwave caramel sauce:
- For the ice-cream, pour the cream in a cold bowl and start whisking on a high speed to soft/medium peeks..
- Add the vanilla paste and fold the condensed milk..
- At this point, start whisking again while adding the peanut butter. You could soften the peanut butter further, by microwaving at increments of 10 seconds until it becomes easy to pour..
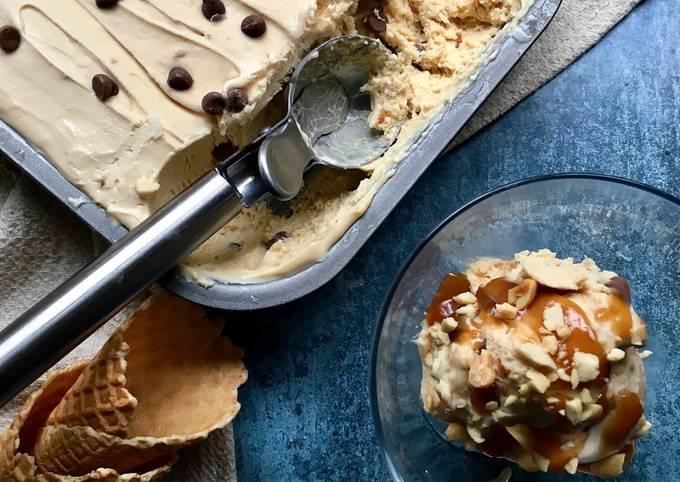
- Keep whisking to medium/stiff peeks, be mindful of not overwhipping to avoid taking the cream to far. This is a good time to add your topping, I used some milk chocolate chips. Pour the mixture in a 1lb loaf tin and freeze for 4 hours until set, or overnight. Before enjoying, let the ice cream rest for about 15 minutes outside of the freezer. You can serve topping with the caramel sauce and some roasted and salted peanuts..
- For the caramel sauce, in a microwave proof jug, add the sugar and the butter and microwave until melted and of a light brown colour. When both completely melted, add the double cream by rapidly whisking together. This will give you a great sauce. If the mixture solidifies, just microwave again in small intervals until dissolved again..
So that is going to wrap this up with this exceptional food no-churn no machine peanut butter ice-cream and microwave caramel sauce recipe. Thank you very much for reading. I'm confident you can make this at home. There's gonna be more interesting food at home recipes coming up. Don't forget to bookmark this page in your browser, and share it to your family, colleague and friends. Thank you for reading. Go on get cooking!
No-churn no machine peanut butter ice-cream and microwave caramel sauce Recipe Video:


Comments
Post a Comment